1,000 Calorie One-Pot Backpacking Meal Recipes
By Erik the Black
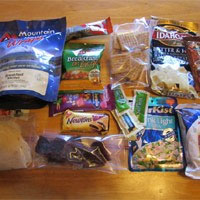
Looking for some new backpacking food ideas? Here are ten of my favorite high-calorie, lightweight backpacking meal recipes. Each meal includes an entree, hot drink and dessert and provides at least 1,000 calories. They are quick and easy to prepare on the trail, most ingredients can be found in grocery stores and they are less expensive than freeze-dried backpacking meals.

Happy trails,
PCT, JMT, TRT & CT Thru-Hiker
Ultralight Backpacking Cooking Equipment
All you need to make my simple backpacking meals is a stove, pot, cup, spoon and pot-cozy (optional.)

This is the cooking gear I use:
- Snowpeak LiteMax Stove (2 oz)
- Evernew Titanium 900ml Pot (4.9 oz)
- Evernew Titanium 400ml Cup (1.8 oz)
- Light My Fire Spork (0.3 oz)
- Home-made Pot Cozy (2 oz)
Total weight: 11 ounces
Monster Mac & Cheese - Backpacking Meal Recipe
Calories: 1660, Dry Weight: 16.2 oz, Protein: 73g, Carbs: 225g, Fat: 52g
Mac & Cheese Entree: 12 oz (1140 cal), Hot Cocoa: 1.2 oz (145 cal), Cookies: 3 oz (375 cal)

This is the granddaddy of hungry thru-hiker meals. It’s cheap, easy to cook, packed full of calories and you can find the ingredients in most convenience stores wherever you travel. This is my go-to meal after a long day on the trail when I’m craving comfort food.
Ingredients:
- 1 box Kraft Macaroni & Cheese
- 2.6 oz Foil-Pouch Tuna (or other shelf-stable meat)
- 1 Cheese Stick (cubed)
- 1 tbsp Whole Milk Powder
- 1 tbsp Grated Parmesan
- 1 tbsp Olive Oil
- Seasoning: Black Pepper, Onion Powder, Italian Seasoning (optional)
- Water: 3 cups (24 fl oz)
- Hot Drink: 1 pk Hot Cocoa Mix
- Dessert: 2 Grandma’s Cookies
Directions:
Bring 3 cups water to boil in pot. Pour off 1 cup hot water into mug for cocoa, then return pot to flame.
Add macaroni and boil for 6-8 minutes, stirring occasionally, until noodles are cooked and water is mostly absorbed.
Add olive oil, cheese powder, milk powder, seasonings, real cheese cubes and tuna. Stir to combine, cover and transfer to pot-cozy for 2-3 minutes until cheese becomes ooey-gooey and delicious.
Top with grated Parmesan and dig in.
Parmesan Chicken Couscous - Backpacking Meal Recipe
Calories: 1260, Dry Weight: 13.6 oz, Protein: 50g, Carbs: 182g, Fat: 37g
Couscous Entree: 9.9 oz (870 cal), Coffee: 0.5 oz (60 cal), Cupcakes: 3.2 oz (330 cal)

This is one of the quickest and easiest backpacking meals. Couscous requires no simmering, just add boiling water and let it sit for a few minutes. I make this meal whenever I’m tired and hungry, don’t feel like cooking and need food in the belly ASAP.
Ingredients:
- 1 box Near East Couscous (Herbed Chicken)
- 2.6 oz Foil-Pouch Chicken (or Tuna)
- 1 tbsp Grated Parmesan
- 1 tbsp Olive Oil
- Water: 2 1/4 cups (18 fl oz)
- Hot Drink: 1 pk Instant Coffee w/ 4 tsp Powdered Creamer
- Dessert: 2 Hostess Cupcakes
Directions:
Bring 2 1/4 cups water to boil in pot. Pour off 1 cup hot water into mug for coffee, then transfer pot to cozy.
Add olive oil, seasoning packet, couscous and chicken. Stir briefly, cover pot with lid and let sit for 3-5 minutes, or until water is absorbed.
Fluff with spoon and top with Parmesan.
Cheesy Bacon Mashed Potatoes - Backpacking Meal Recipe
Calories: 1250, Dry Weight: 9.5 oz, Protein: 35g, Carbs: 130g, Fat: 65g
Mashed Potato Entree: 6.2 oz (750 cal), Hot Tea: 0.5 oz (60 cal), Peanut Butter Cups: 2.8 oz (440 cal)

Here’s another quickie that requires very little cooking time. It’s also one of the lightest and most calorie-dense backpacking meals on this list. These cheesy, baconey, gooey mashed potatoes give new meaning to the term: “sticks to the ribs.”
Ingredients:
- 1 pouch Idahoan Mashed Potatoes (Loaded Baked)
- 1 oz Bacon Bits
- 1 Cheese Stick (cubed)
- 1 tbsp Olive Oil
- Seasoning: Dried Chives (optional)
- Water: 3 cups (24 oz)
- Hot Drink: 1 bag Chai Tea w/ 4 tsp Powdered Creamer
- Dessert: 2 Reese’s Big Peanut Butter Cups
Directions:
Bring 3 cups water to boil in pot. Pour off 1 cup hot water into mug for tea, then transfer pot to cozy.
Add olive oil, potatoes, bacon and cheese. Stir until combined, cover pot with lid and let sit for 1-3 minutes, or until water is absorbed.
Fluff with spoon and top with dried chives.
Homestyle Turkey-ish Dinner - Backpacking Meal Recipe
Calories: 1420, Dry Weight: 15.7 oz, Protein: 48g, Carbs: 223g, Fat: 37g
Dinner Entree: 11 oz (935 cal), Hot Cider: 0.7 oz (80 cal), Cherry Pie: 4 oz (405 cal)

This meal reminds of Thanksgiving dinner. Sometimes, after a long, lonely day on the trail when I’m feeling a bit homesick, I’ll make this and it always cheers me right up. Something about the familiar tastes of the holiday season soothes my soul (and my stomach.)
Ingredients:
- 1 box Kraft Stovetop Stuffing
- 2.6 oz Foil-Pouch Chicken
- 1 tbsp each: Dried Onions, Celery & Carrots
- 1 oz Dried Cranberries
- 1 tbsp Olive Oil
- Water: 2 1/2 cups (20 oz)
- Hot Drink: 1 pk Spiced Hot Apple Cider Mix
- Dessert: 1 Cherry Snack Pie
Directions:
Bring 2 1/2 cups water to boil in pot. Pour off 1 cup hot water into mug for cider, then return pot to flame.
Add olive oil, onions, celery, carrots and cranberries and simmer for 3-5 minutes. Add stuffing, stir carefully to combine (pot will be very full), then add chicken. Cover pot with lid and transfer to cozy for 5 minutes, or until all water is absorbed.
Fluff with a spork and enjoy.
Chicken Pasta Primavera - Backpacking Meal Recipe
Calories: 1250, Dry Weight: 12 oz, Protein: 47g, Carbs: 152g, Fat: 51g
Pasta Entree: 8.9 oz (790 cal), Hot Tea: 0.5 oz (60 cal), Chocolate Bar: 2.6 oz (400 cal)

My favorite freeze-dried backpacking meal is Mountain House Pasta Primavera. Unfortunately, freeze-dried meals are expensive, don’t have that many calories and are not sold in most grocery stores. So, I decided to try and make my own budget-friendly version.
Ingredients:
- 1 pouch Knorr Pasta Sides (Creamy Garlic)
- 2.6 oz Foil Pouch Chicken (or Tuna)
- 1 tbsp each: Dried Broccoli, Carrots, Bell Peppers & Leeks
- 1 tbsp Whole Milk Powder
- 1 tbsp Grated Parmesan
- 1 tbsp Olive Oil
- Seasoning: Black Pepper, Dried Parsley (optional)
- Water: 2 3/4 cups (22 oz)
- Hot Drink: 2 bags Black Tea w/ 4 tsp Powdered Creamer
- Dessert: 1 Hershey’s King-Size Chocolate Bar
Directions:
Bring 2 3/4 cups water to boil in pot. Pour off 1 cup hot water into mug for tea, then return pot to flame.
Add milk powder, olive oil, dried veggies, pasta and seasoning mix and boil gently for 5 minutes, stirring occasionally. Add chicken, cover pot with lid and transfer to pot-cozy for 5 more minutes, or until noodles are cooked and sauce has thickened.
Season with pepper, parsley and top with grated Parmesan.
Bacon & Egg Scramble - Backpacking Meal Recipe
Calories: 1315, Dry Weight: 9.8 oz, Protein: 57g, Carbs: 78g, Fat: 86g
Bacon & Eggs Entree: 4.5 oz (725 cal), Coffee: 0.5 oz (60 cal), Honey Bun: 4.8 oz (530 cal)

I love eggs, but I could never find a good way to make them on the trail …until now. The secret is Ova Easy Egg Crystals. Unlike other powdered eggs, these cook and taste like real eggs! They’re a bit pricey, but it’s worth it to have something other than oatmeal.
Ingredients:
- 1/2 pkg (2.25 oz) OvaEasy Egg Crystals (equivalent to 6 eggs)
- 1 oz Bacon Bits
- 1 tbsp each: Dried Onions, Leeks & Bell Peppers
- 1 Cheese Stick (cubed)
- 1 tbsp Olive Oil
- Seasoning: Salt, Black Pepper, Dried Thyme (optional)
- Water: 2 1/8 cups (17 oz)
- Hot Drink: 1 pk Instant Coffee w/ 4 tsp Powdered Creamer
- Dessert: 1 Jumbo Honey Bun
Directions:
In a quart Ziploc, mix: egg crystals, dried veggies, seasonings and 1 1/8 cup water. Set aside for 5 minutes so veggies can re-hydrate.
Bring remaining 1 cup water to boil and pour into mug for coffee.
Return pot to flame over very low heat, add olive oil and then scramble egg mixture, stirring frequently so they don’t stick.
When eggs are nearly set up, mix in bacon and cheese, remove from heat and cover for 1-2 minutes until cheese is all melted.
Apple Pecan Loaded Oatmeal - Backpacking Meal Recipe
Calories: 1475, Dry Weight: 11.3 oz, Protein: 26g, Carbs: 221g, Fat: 54g
Oatmeal Entree: 7.1 oz (990 cal), Coffee: 0.5 oz (60 cal), Donuts: 3.7 oz (425 cal)

This is the perfect breakfast for when you have to climb a huge mountain before lunch. It’s hot, sweet and packed full of carbs for all-day energy. I’m not a fan of the goopey texture of oatmeal, so I like to chunkify mine with granola, nuts and dried fruit.
Ingredients:
- 2 packs Quaker Maple & Brown Sugar Oatmeal
- 1/2 cup Nature Valley Protein Granola Cereal
- 1 tbsp Whole Milk Powder
- 1 oz Raisins (or Dried Cranberries)
- 1 oz Dried Apples
- 1 oz Chopped Pecans
- Seasoning: Cinnamon (optional)
- Water: 2 1/2 cups (20 oz)
- Hot Drink: 1 pk Instant Coffee w/ 4 tsp Powdered Creamer
- Dessert: 6 Hostess Donettes
Directions:
Bring 2 1/2 cups water to boil in pot. Pour 1 off cup hot water into mug for coffee, then return pot to flame.
Add milk powder, dried fruit, nuts, oatmeal and granola and simmer for 3-5 minutes, or until it reaches the consistency you like. Top with a dash of cinnamon.
Allow to cool for a few minutes before eating because this stays hot for a long time.
Hearty Split Pea Soup - Backpacking Meal Recipe
Calories: 1110, Dry Weight: 9.3 oz, Protein: 29g, Carbs: 146g, Fat: 46g
Pea Soup Entree: 5.1 oz (610 cal), Hot Cocoa: 1.2 oz (145 cal), Candy: 3 oz (355 cal)

This is one of those meals I hated as a child, but love as an adult. If you haven’t tried split pea soup in a while, I encourage you to give it another shot. Sure, it looks green and slimy, but it tastes great! I like to eat this after a long hike on a crisp Fall evening.
Ingredients:
- 1/4 pouch (2.1 oz) Bear Creek Split Pea Soup Mix
- 2.5 oz Foil Pouch Spam Single (diced)
- 1 tbsp each: Dried Onions, Carrots, Celery
- 1/4 cup (1 oz) Seasoned Croutons
- 1 tbsp Grated Parmesan
- 1 tbsp Olive Oil
- Water: 3 cups (24 oz)
- Hot Drink: 1 pk Hot Cocoa Mix
- Dessert: 1 bag Chocolate Blueberry Candy
Directions:
Dice Spam and fry in olive oil. Remove and set aside.
Bring 3 cups water to boil in pot. Pour off 1 cup hot water into mug for cocoa, then return pot to flame.
Add dried veggies, split pea soup mix and fried Spam. Simmer for 5 minutes, stirring occasionally. Cover pot with lid and transfer to pot-cozy for 5 more minutes, or until peas are fully cooked.
Top with croutons and grated Parmesan.
Darn Good Trail Chili - Backpacking Meal Recipe
Calories: 1010, Dry Weight: 8.3 oz, Protein: 45g, Carbs: 110g, Fat: 43g
Chili Entree: 5.8 oz (660 cal), Coffee: 0.5 oz (60 cal), Snack Mix: 3 oz (290 cal)

After a long dusty day on the trail, nothing warms you up like a like a bowl of hot chili. Fair warning: This is best eaten when solo camping, if you don’t want to risk the wrath of your camp mates. Flatulence aside, chili is great for cowpokes and trailpokes alike.
Ingredients:
- 1/3 pouch (3.3 oz) Bear Creek Darn Good Chili Mix
- 1/4 cup (1 oz) Freeze Dried Ground Beef
- 1 tbsp each: Dried Onions, Diced Tomatoes, Tomato Powder
- 1 Cheese Stick (cubed)
- 1 tbsp Olive Oil
- Seasoning: Salt, Pepper, Parsley (optional)
- Water: 3 cups (24 oz)
- Hot Drink: 1 pk Instant Coffee w/ 4 tsp Powdered Creamer
- Dessert: 1 pack Reese’s Snack Mix
Directions:
Bring 3 cups water to boil in pot. Pour off 1 cup hot water into mug for coffee, then return pot to flame.
Add olive oil, dried veggies, tomato powder, ground beef and chili mix. Simmer for 5 minutes, stirring occasionally. Cover pot with lid and transfer to pot-cozy for 5 more minutes, or until beans are fully cooked.
Top with cheese and season with salt, pepper and parsley.
Spicy Southwest Taco Rice - Backpacking Meal Recipe
Calories: 1510, Dry Weight: 13.8 oz, Protein: 44g, Carbs: 244g, Fat: 40g
Rice Entree: 8.6 oz (940 cal), Hot Cocoa: 1.2 oz (145 cal), Fig Newtons: 4 oz (425 cal)

Here’s another one of my favorite backpacking meals. Tender rice and crispy tortilla strips with taco seasoning, veggies, hot sauce and bold Mexican flavors. This is the opposite of bland trail food. If it didn’t have so many calories, I’d even eat this at home!
Ingredients:
- 1 pouch Knorr Rice Sides (Taco Rice)
- 1/4 cup (1 oz) Freeze Dried Ground Beef
- 1 tbsp each: Dried Onion, Corn, Bell Pepper, Diced Tomato
- 1 Cheese Stick (cubed)
- 1/2 oz Seasoned Tortilla Strips
- 1 tbsp Olive Oil
- Seasoning: Dried Cilantro, Hot Sauce (optional)
- Water: 3 cups (24 oz)
- Hot Drink: 1 pk Hot Cocoa Mix w/ Chili Powder & Cinnamon (optional)
- Dessert: 4 Fig Newtons
Directions:
Bring 3 cups water to boil in pot. Pour off 1 cup hot water into mug for cocoa, then return pot to flame.
Add olive oil, dried veggies, ground beef and rice mixture. Cover and simmer on low heat for 5 minutes. Stir and transfer to pot-cozy for 5 minutes, or until rice is tender and water is absorbed.
Season with dried cilantro and hot sauce and top with tortilla strips and cheese.
Affiliate Disclosure: If you order from the links on this website, I may receive a small commission at no additional cost to you. Thanks for your support!
Related Posts
Five Day Lightweight Backpacking Meal Plan
A complete 5-day meal plan for long-distance backpackers. Provides 3,500 calories per day from 2 lbs of food.

Top 10 Ultralight Backpacking Foods
Ten staple backpacking foods that are lightweight, shelf-stable, easy to pack and easy to prepare on the trail.
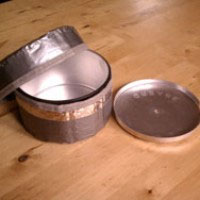
How To Make A Backpacking Pot Cozy
This easy DIY project will help you conserve fuel and simplify trail cooking (and it doubles as a carrying case for your pot.)
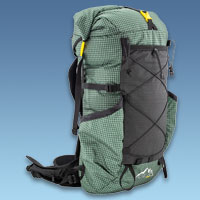
Example Lightweight Backpacking Gear Lists
Not sure what kind of gear to pack for your upcoming hike? Here are six example gear lists to help you get started.
TRAIL MAPS
POCKET ATLASES
GEAR LISTS
BlackwoodsPress.com
Copyright © 2026 by Erik Asorson